Deploy EventCatalog to AWS CloudFront with Google SSO Access Control via Terraform


This article shows how to deploy your own EventCatalog in AWS CloudFront via Terraform and updates to the Catalog via CI/CD (CircleCi in this case, but can be easily applied to other CI systems). It also shows how to use Lambda@Edge to implement Google SSO / OpenID Connect via the Widen/cloudfront-auth Project.
EventCatalog was created by David Boyne. It is an wonderful Open Source project that acts as a unifying Documentation tool for Event-Driven Architectures. It helps you document, visualize and keep on top of your Event Driven Architectures' events, schemas, producers, consumers and services.
You can go to the above links to find out more about EventCatalog itself.
Working on having a github repo with the full example at some point soon.
Table of Contents
-
1.1. Requirements
1.2. Generate the Scaffold Project Website 2. Create the Terraform to deploy to Cloudfront
2.4. Create the lambda.tf file
2.5. Create the cloudfront.tf file
2.6. Create the variables.tf file
2.7. Create the sandbox.tfvars file
2.8. Create a placeholder lambda code zip file 3. Initial deployment with temp lambda@edge code 4. Build the Lambda@edge code with Widen/cloudfront-auth
4.9. Create the OAuth Credentials in the Google developers console
     a. [Create a new Project](#create-a-new-project)

     b. [Create OAuth Consent and Credentials](#create-oauth-consent-and-credentials)
4.10. Generate the code for Lambda@edge 5. Deploy the EventCatalog content to S3
5.11. Manual deployment
5.12. Deployment with CircleCi 6. Deploy the new lambda@edge code with terraform 7. Improvements? Suggestions? Alternatives? 8. About the Author
Create EventCatalog Project
You can create a sample EventCatalog Project using the EventCatalog CLI. This can be the scaffolding for your own project. In this case we're going to use the sample project it will install as our project for this article.
Requirements
Node.js version >= 14 or above (which can be checked by running node -v). You can use nvm for managing multiple Node versions on a single machine installed
- We're going to be using Node.js version 16.x.x
Yarn version >= 1.5 (which can be checked by running yarn --version). Yarn is a performant package manager for JavaScript and replaces the npm client. It is not strictly necessary but highly encouraged.
- We're using Yarn 1.22.x
Generate the Scaffold Project Website
Go to a directory on your computer's filesystem where you want to save the project.
Generate the scaffolding for the project
- We're going to call the project
my-catalog
- We're going to call the project
```shell
npx @eventcatalog/create-eventcatalog@latest my-catalog
```

* This will generate a new directory structure as a git project:


```plaintext
my-catalog
├── services
│   ├── Basket Service
│   │     └──index.md
│   ├── Data Lake
│   │     └──index.md
│   ├── Payment Service
│   │     └──index.md
│   ├── Shipping Service
│   │     └──index.md
├── events
│   ├── AddedItemToCart
│   │     └──versioned
│   │     │  └──0.0.1
│   │     │     └──index.md
│   │     │     └──schema.json
│   │     └──index.md
│   │     └──schema.json
│   ├── OrderComplete
│   │     └──index.md
│   │     └──schema.json
│   ├── OrderConfirmed
│   │     └──index.md
│   │     └──schema.json
│   ├── OrderRequested
│   │     └──index.md
│   ├── PaymentProcessed
│   │     └──index.md
├── static
│   └── img
├── eventcatalog.config.js
├── .eventcatalog-core/
├── package.json
├── README.md
├── yarn.lock
├── Dockefile
├── .dockerignore
├── .gitignore
└── .git/
```
Change directory into
my-catalogYou can preview the EventCatalog with the command:
npm run devAnd then point your browser to localhost:3000
- You will be able to view the sample Events, Services, and Domains there.
Once you are done checking it out, kill the npm proces with CTL-C
Create the Terraform to deploy to Cloudfront
Create a
terraformdirectory inmy-catalogand add anassetsdirectory to it- You could make this directory outside of the catalog if you would prefer to manage it that way
```shell
mkdir -p terraform/assets
cd terraform
```
- Create a
.gitignorein the terraform directory
curl https://raw.githubusercontent.com/github/gitignore/main/Terraform.gitignore -o terraform/.gitignore
Create the file main.tf
This file has all the terraform code to:
Set up the terraform environment
Specify the AWS provider
alt_fqdns a placeholder for now. May want to make alt_fqds a variable. It needs to be a list of strings Used by cloudfront.tf to specify aliases for the certificate and DNS but its kind of hard to support that with the sso callback
###
### Using locals to form variables by concatinating input variables
### Unfortunately can not do that in variables.tf or <env>.tfvars
###
locals {
  fqdn        = "${var.app_name}-${var.project_name}.${var.environment}.${var.base_domain_name}"
  alt_fqdns   = []
  zone_name   = "${var.environment}.${var.base_domain_name}"
  lambda_name = "${var.environment}-${var.project_name}-${var.app_name}-${var.lambda_name_suffix}"
}

terraform {
  required_version = ">= 1.2.0"
  required_providers {
    aws = {
      source = "hashicorp/aws"
      # Need to use version < 4.0.0 to work with cloudposse/cloudfront-s3-cdn
      version = ">= 3.75.2"
    }
  }
  # You should use a different state management than local
  backend "local" {}
}

provider "aws" {
  region  = var.region
  profile = var.profile
}
Create the lambda.tf file
Configure the AWS IAM role and policies for the lambda@edge
Create the lambda@edge service
### Set up IAM role and policies for the lambda
data "aws_iam_policy_document" "lambda_edge_assume_role" {
  statement {
    actions = ["sts:AssumeRole"]

    principals {
      type = "Service"
      identifiers = [
        "lambda.amazonaws.com",
        "edgelambda.amazonaws.com"
      ]
    }
  }
}

# Define the IAM role for logging from the Lambda function.
data "aws_iam_policy_document" "lambda_edge_logging_policy" {
  statement {
    effect = "Allow"
    actions = [
      "logs:CreateLogGroup",
      "logs:CreateLogStream",
      "logs:PutLogEvents"
    ]
    resources = ["arn:aws:logs:*:*:*"]
  }
}

# Add IAM policy for logging to the iam role
resource "aws_iam_role_policy" "lambda_edge_logging" {
  name = "${local.lambda_name}-lambda_edge_logging"
  role = aws_iam_role.lambda_edge.id

  policy = data.aws_iam_policy_document.lambda_edge_logging_policy.json
}


# Create the iam role for the lambda function
resource "aws_iam_role" "lambda_edge" {
  name               = "${var.app_name}_lambda_edge_cloudfront"
  assume_role_policy = data.aws_iam_policy_document.lambda_edge_assume_role.json
}

# Create the lambda@edge function
resource "aws_lambda_function" "edge" {
  filename      = var.lambda_file_name
  function_name = local.lambda_name
  role          = aws_iam_role.lambda_edge.arn
  handler       = "index.handler"
  timeout       = "5"
  publish       = true

  # The filebase64sha256() function is available in Terraform 0.11.12 and later
  # For Terraform 0.11.11 and earlier, use the base64sha256() function and the file() function:
  # source_code_hash = "${base64sha256(file("lambda_function_payload.zip"))}"
  source_code_hash = filebase64sha256(var.lambda_file_name)

  runtime = "nodejs12.x"

}
Create the cloudfront.tf file
Create the CloudFront CDN instance and S3 bucket with lambda@edge association
Uses the cloudposse/cloudfront-s3-cdn/aws terraform module to do all the hard work
This module currently will work only with the
hashicorp/awsprovider of versions< 4.0.0- This is why we are not using the latest version of the
hashicorp/awsprovider
- This is why we are not using the latest version of the
Create the TLS Certificate using AWS ACM
module "cloudfront-s3-cdn" {
  source  = "cloudposse/cloudfront-s3-cdn/aws"
  version = "0.82.4"

  namespace               = var.bucket_namespace
  environment             = var.environment
  stage                   = var.project_name
  name                    = var.app_name
  encryption_enabled      = true
  allow_ssl_requests_only = false
  # This will allow a complete deletion of the bucket and all of its contents
  origin_force_destroy = true

  # DNS Settings
  parent_zone_id      = var.zone_id
  acm_certificate_arn = module.acm_request_certificate.arn
  aliases             = concat([local.fqdn], local.alt_fqdns)
  ipv6_enabled        = true
  dns_alias_enabled   = true

  # Caching Settings
  default_ttl = 300
  compress    = true

  # Website settings
  website_enabled = true
  index_document  = "index.html"
  error_document  = "404.html"

  depends_on = [module.acm_request_certificate]

  # Link Lambda@Edge to the CloudFront distribution
  lambda_function_association = [{
    event_type   = "viewer-request"
    include_body = false
    lambda_arn   = aws_lambda_function.edge.qualified_arn
  }]
}


###
### Request an SSL certificate
###
module "acm_request_certificate" {
  source                            = "cloudposse/acm-request-certificate/aws"
  version                           = "0.16.0"
  domain_name                       = local.fqdn
  subject_alternative_names         = local.alt_fqdns
  process_domain_validation_options = true
  ttl                               = "300"
  wait_for_certificate_issued       = true
  zone_name                         = local.zone_name
}
Create the variables.tf file
- Variable Definitions for EventCatalog-Sandbox
variable "region" {
  description = "The region to use for the Terraform run"
  default     = ""
}

variable "profile" {
  description = "The local IAM profile to use for the Terraform run"
  default     = ""
}

variable "environment" {
  description = "The environment to use for the Terraform run"
  default     = ""
}

variable "project_name" {
  description = "The name of the project to use"
  default     = ""
}

variable "app_name" {
  description = "The name of this app"
  default     = "eventcatalog"
}

variable "base_domain_name" {
  description = "The base domain name for the environment"
  default     = ""
}

variable "bucket_namespace" {
  description = "The namespace prefix for s3 buckets"
  default     = ""
}

variable "zone_id" {
  description = "The route53 zone id for the domain zone of the FQDNs"
  default     = ""
}

variable "lambda_file_name" {
  description = "The name of the lambda function file that was generated by the Widen/cloudfront-auth project"
  default     = ""
}

variable "lambda_name_suffix" {
  description = "The suffix to append to the lambda function name to make it unique if need to destroy and recrete CloudFront distribution"
  default     = "000"
}
Create the sandbox.tfvars file
This file sets or overrides the default values for the terraform run
Set these as appropriate for your environment
Region may need to be
us-east-1
region           = "us-east-1"
profile          = "sandbox"
environment      = "rob"
project_name     = "blogpost"
app_name         = "eventcatalog"
lambda_file_name = "assets/temp.zip"

##
## These must be different for your environment
base_domain_name = "informediq-infra.com"
bucket_namespace = "informediq"
zone_id          = "Z10***********************K7U"
Create a placeholder lambda code zip file
We have a slight chicken and egg problem where we need to have the Cloudformation name to create the lambda@edge code zip file with the Widen/cloudfront-auth project.
So we'll make a dummy temp zip file to start with.
Create a file
assets/temp.jswith the following content:exports.handler = async (event) => { // TODO implement const response = { statusCode: 200, body: JSON.stringify('Hello from Lambda!'), }; return response; };Zip that file
  cd assets
  zip -r temp.zip temp.js
  cd ..
Initial deployment with temp lambda@edge code
Setup any credentials/login needed to run the AWS CLI / Terraform CLI from your shell window.
The first time you want to run things (or anytime you add terraform modules)
terraform initDo the Terraform apply
You could do a plan, but we're deploying for the first time anyway
We are specifying it to use the
sandbox.tfvarsfile to supply the input of the variables needed
```shell
terraform apply  -var-file=sandbox.tfvars
```
The first run of this may take a long time to complete. I've seen it seem to be stuck at
 module.cloudfront-s3-cdn.module.logs.aws_s3_bucket.default[0]: Still creating...
 module.cloudfront-s3-cdn.aws_s3_bucket.origin[0]: Still creating...
for more than 30 minutes. Not sure why. But after the first run its fast.
You may also get a warning:
│ Warning: Argument is deprecatedYou can ignore that. Seems to be something depreciated that is used by the cloudposse/cloudfront-s3-cdn/aws terraform module.
At the end of the run it will print out the outputs with something like:
Apply complete! Resources: 14 added, 0 changed, 0 destroyed.

Outputs:

cf_aliases = tolist([
  "eventcatalog-projectname.rob.informediq-infra.com",
  "eventcatalog.rob.informediq-infra.com",
])
cf_domain_name = "d32pr*******z3r.cloudfront.net"
s3_bucket = "informediq-rob-eventcatalog-origin"
Some of this info will be needed for the following steps to setup the Google SSO.
At this point if you tried to access https://eventcatalog.rob.informediq-infra.com you would get an error since the lambda@edge has the dummy code in it. This will be rectified in the following steps.
Build the Lambda@edge code with Widen/cloudfront-auth
Clone the Widen/cloudfront-auth repo in a directory outside of your my-catalog EventCatalog or terroform repo.
 git clone git@github.com:Widen/cloudfront-auth.git
 cd cloudfront-auth
Follow the instructions in the README for the Identity Provider of your choice. We are going to use the Google Hosted Domain mechanism:
Create the OAuth Credentials in the Google developers console
This assumes you don't already have a Project in the Google Developers Console but you have an account in the Google Developers Console.
Create a new Project
Click on the Projects pulldown on the very top menubar to the right of the
Google CloudlogoClick on
New projectin the modal popup that shows after clicking the pulldown
Fill in the New Project Form and click on
CREATE
Create OAuth Consent and Credentials
Select
APIs & Servicesfrom the menu bar on the left to go to that page of the projectSelect
Credentialsfrom the new menu bar on the leftClick on
Configure Consent Screento configure the OAuth consent infoSelect
Internaland then click onCREATE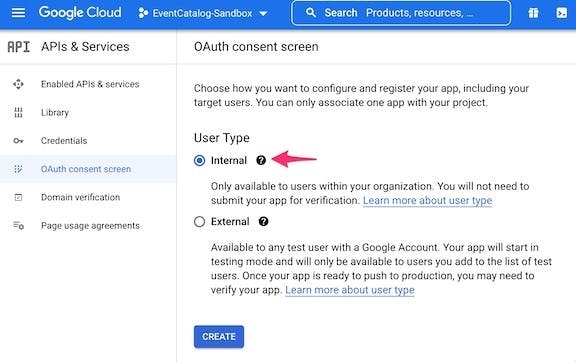
Fill in at least
App Name (
EventCatalog Sandbox)User Support email
- This will be a pulldown and should have the email associated with the Google Dev account
Authorized domains
This should be the domain used for the email address of people logging in via Google SSO.
In my case this is
informed.iq
Developer contact information email address
Can be your email
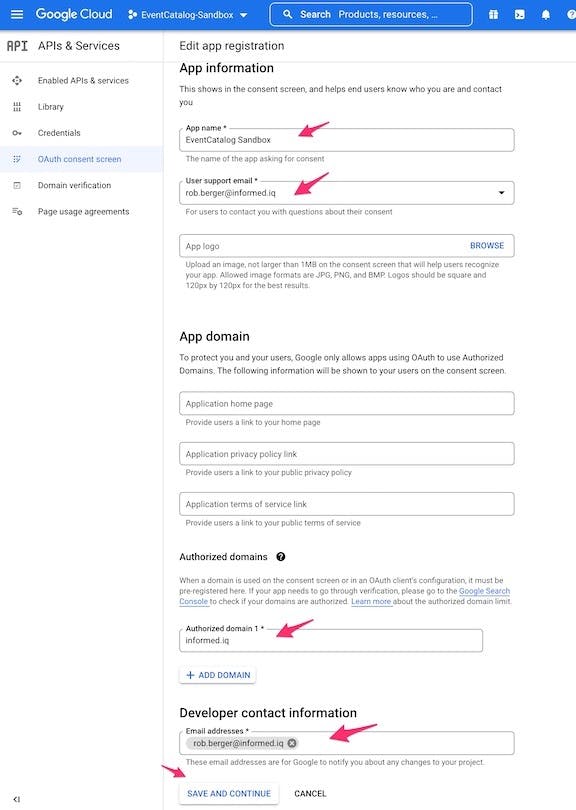
Click
SAVE AND CONTINUEClick
SAVE AND CONTINUEon the next screen (Scopes Page)Click on
BACK TO DASHBOARDon the next screen (Summary Page)Click on
Credentialson the left hand nav bar to get back to the Credentials page
Click on
+ Create Credentialson the top menu bar and selectOAuth client IDfrom the pulldownSelect Web application for the Application type
Under Authorized redirect URIs, enter your Cloudfront hostname with your preferred path value for the authorization callback. For our working example:
https://eventcatalog-projectname.rob.informediq-infra.com/_callbackClick
CREATEwhen done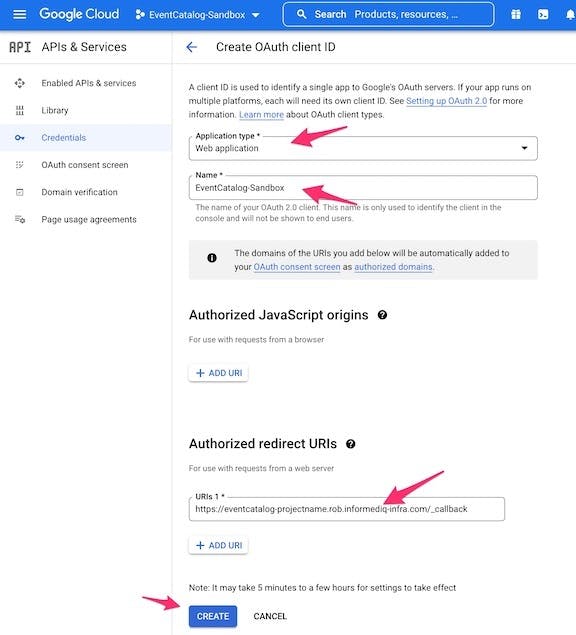
Capture the resulting OAuth Client ID and Secret
A modal window will show the OAuth Client ID and secret.
You should store that somewhere, though you can also always view it on the Google Console later
You can also download the JSON with the info and save it that way
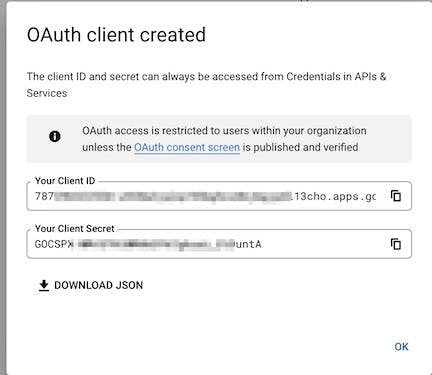
We're now done with the Google Developer's Console
Generate the code for Lambda@edge
NOTE: Make sure you are in the Widen/cloudfront-auth directory for the following commands
Unfortunately, The Widen/cloudfront-auth project has not seen any updates in a while. But it is still widely used.
You can first run:
npm audit fix --force
To at least remove some blatant high risk vulnerabilities. It seens to not impact the actual use of the project.
Execute
./build.sh. NPM will run to download dependencies and a RSA key will be generated.There will be some messages about the npm install
There is a
Warningthat seems to be filling in the value of the first prompt>: Enter distribution name:you can ignore the warning and start filling in the valuesDistribution Name- The value ofcf_domain_namefrom the terraform runAuthentication methods- 1 GoogleClient ID- The Client ID generated in the Google Console OAuth Credentials processClient Secret- The Client Secret generated in the Google Console OAuth Credentials processRedirect URI- The URL based on the domain name for the Cloudfront instance which was passed in the Google Console OAuth Credentials processHosted Domain- The email address domainname that will be used by people logging in via Google SSOSession Duration- How many hours the session should last until the user needs to re-authenticateAuthorization methods- We are selecting1forHosted Domain
NOTE: Redacting a few items for security
>: Enter distribution name: d32pr*******z3r.cloudfront.net
>: Authentication methods:
    (1) Google
    (2) Microsoft
    (3) GitHub
    (4) OKTA
    (5) Auth0
    (6) Centrify
    (7) OKTA Native

    Select an authentication method: 1
Generating public/private rsa key pair.
Your identification has been saved in ./distributions/d32pr*******z3r.cloudfront.net/id_rsa
Your public key has been saved in ./distributions/d32pr*******z3r.cloudfront.net/id_rsa.pub
The key fingerprint is:
SHA256:vJS0/*************************************************iE2ic rberger@tardis.local
The key's randomart image is:
+---[RSA 4096]----+
|       .o. =. .==|
|         oo.+.=.+|
|        ooo .o.B.|
|       o.+E...= .|
|        S .o   o.|
|       . +... + o|
|        o o+.o + |
|         . ==..  |
|          +=+o.  |
+----[SHA256]-----+
writing RSA key
>>: Client ID: 787***********************13cho.apps.googleusercontent.com
>>: Client Secret: GOCSPX-****************untA
>>: Redirect URI: https://eventcatalog-projectname.rob.informediq-infra.com/_callback
>>: Hosted Domain: informed.iq
>>: Session Duration (hours):  (0)  12
>>: Authorization methods:
   (1) Hosted Domain - verify email's domain matches that of the given hosted domain
   (2) HTTP Email Lookup - verify email exists in JSON array located at given HTTP endpoint
   (3) Google Groups Lookup - verify email exists in one of given Google Groups

   Select an authorization method: 1
Copy the resulting
zipfile found in the distribution folder in the Widen/cloudfront-auth directory to theassetsdirectory in the terraform directoryThe process will output the path that the zip file was saved as relative to.
In my setup the command to do the copy is:
cp distributions/d32pr*******z3r.cloudfront.net/d32pr*******z3r.cloudfront.net.zip ../my-catalog/terraform/assets
Deploy the EventCatalog content to S3
You can deploy the content manually. But you really should use a CI/CD systems to deploy the EventCatalog content.
Manual deployment
The key actions needed are to:
Change directory to be in the top of the EventCatalog repo
Build the static assets using the EventCatalog cli
Copy the static assets to the S3 bucket created by Terraform
First we'll show doing it manually
Build the static assets
Assumes you are in the top level of the EventCatalog Repo
You only need to do
yarn installthe first time you use any of the commands
```shell
yarn install
yarn build
```
Upload the static assets to S3
Assumes you have installed the AWS CLI
You have configured you local shell environment with proper IAM Profile to run the AWS CLI
Use the actual s3 bucket you created in your terraform run
- The example shows the bucket we've used in our working example
aws s3 sync .eventcatalog-core/out s3://informediq-rob-eventcatalog-origin
Deployment with CircleCi
Assumes you have a CircleCI account and have it hooked up to your Github account.
- It is beyond the scope of this article to show how to setup and use Github and CircleCI
You will need to set CircleCi Project or Context environment variables:
AWS_ACCESS_KEY_IDAWS_SECRET_ACCESS_KEYAWS_Region(Needs to beus-east-1)
Create the
.circlecidirectory at the top of your EventCatalog repo directoryCreate a file
.circleci/config.ymlwith the following content- You will need to substitue the s3 bucket name with the one you actually created with terraform
version: 2.1

# CircleCi Orbs (libraries) used by this config
orbs:
  node: circleci/node@5.0.2
  aws-s3: circleci/aws-s3@3.0.0

jobs:
  eventcatalog-contentbuild:
    docker:
      - image: cimg/node:16.15
    steps:
      - checkout

      - run:
          name: Install EventCatalog tooling
          working_directory: ~/project
          command: if [ ! -e "node_modules/@eventcatalog/core/bin/eventcatalog.js" ]; then yarn install; else echo "eventbridge seems to be cached"; fi;

      - run:
          name: Build the EventCatalog static content
          working_directory: ~/project
          command: |
            echo Running eventbridge build in `pwd`
            yarn build

      - aws-s3/sync:
          # Copy the static content to the S3 bucket
          # Replace the s3 bucket name with the one you actually created with terraform
          aws-region: AWS_REGION
          from: ~/project/.eventcatalog-core/out
          to: s3://informediq-rob-blogpost-eventcatalog-origin

workflows:
  eventcatalog-contentworkflow:
    jobs:
      - eventcatalog-contentbuild:
          context:
            # We're getting the AWS Credentials from our CircleCI Organization context
            # You could also just use Project level Environment Variables with
            # IAM AWS_ACCESS_KEY_ID and AWS_SECRET_ACCESS_KEY
            - rberger-aws-user-creds
Once you have created this file and have all your commits in your EventCatalog Repo, push it to Github which should trigger your CircleCI run.
- You can confirm that it sent it to s3 by using the AWS Console or CLI to view the contents of the S3 bucket.
Deploy the new lambda@edge code with terraform
Go back to your terraform directory.
- Make sure the new zip file is in the
assetsdirectory
- Make sure the new zip file is in the
Update the tfvars input file (
sandbox.tfvarsin our working example) with the new filenamelambda_file_name = "assets/d32pr*******z3r.cloudfront.net.zip"
```plaintext
region           = "us-east-1"
profile          = "sandbox"
environment      = "rob"
project_name     = "blogpost"
app_name         = "eventcatalog"
lambda_file_name = "assets/d32pr*******z3r.cloudfront.net.zip"
## On first run, set lambda_file_name to `assets/temp.zip`
# lambda_file_name = "assets/temp.zip"

##
## These should be different for your environment
base_domain_name = "informediq-infra.com"
bucket_namespace = "informediq"
zone_id          = "Z10***********************K7U"
##
```
Run
terraform applyterraform apply -var-file=sandbox.tfvarsA successful run will display the output values
- They should be something along the lines of the following:
```plaintext
Outputs:

cf_aliases = tolist([
  "eventcatalog-blogpost.rob.informediq-infra.com",
  "eventcatalog.rob.informediq-infra.com",
])
cf_domain_name = "d32pr*******z3r.cloudfront.net"
s3_bucket = "informediq-rob-eventcatalog-origin"
```
You should be able to go to ether of your cf_aliases.
For instance:
https://eventcatalog.rob.informediq-infra.comIf you aren't already logged in, it should pass you to Google SSO authentication.
Once you are logged in you should see the Home Page of the EventCatalog
You can now start using the EventCatalog by updating the source files to fit your Domains, Services, and Events.
Improvements? Suggestions? Alternatives?
Please feel free to comment or contact me if you find any bugs, issues or have suggestions for improvements!
I am interested in hearing about alternatives to the Widen/cloudfront-auth as it has not been updated in a while.
This article was published originally in the InformedIQ Blog